Update or add an image using Divi Builder

We build many WordPress websites using the Divi theme from Elegant Themes. This is because it’s so easy to edit if you haven’t got technical skills and your webdesigner is self-isolating. This short tutorial shows you how to update existing images in the Divi Builder.
Before you start
Make sure your images are of the right quality, orientation and size. Images taken off the web are usually poor in quality and you will need to check for copyright permissions. There are some sites that offer free images for commercial and personal use like Pexels.com but be sure to check.
A typical image has an aspect ratio of 4:3 with a resolution up to 1024px by 768px. An image taken on your phone has a resolution of 3264px by 2448px so you will need to downsample your image before you upload it. You can do this using an image editor like PhotoShop Express. I use the “full-fat” PhotoShop app as part of Adobe’s Creative Cloud subscription which works across desktop and on the iPad.
Prepare your image using PhotoShop – step 1
Open your image in PhotoShop then in the menu go to Image > Crop or choose the crop icon in the toolbar.
You can then adjust the crop settings to the desired width, height measured in pixels as well as the resolution measured in pixels per inch. For websites make this 72ppi.
You can also use the aspect ratio option if you don’t want to enter specific measurements. There are a number of presets to choose from such as 4:3, 16:9 or 4:5.
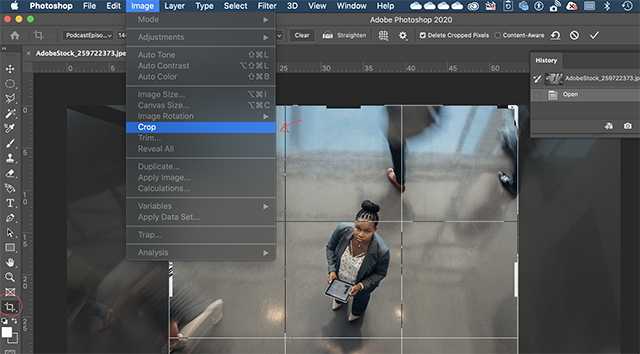
You can then adjust the crop settings from the drop down menu to the desired width, height measured in pixels as well as the resolution measured in pixels per inch. For websites make this 72ppi.
You can also use the aspect ratio option if you don’t want to enter specific measurements. There are a number of presets to choose from such as 4:3, 16:9 or 4:5.

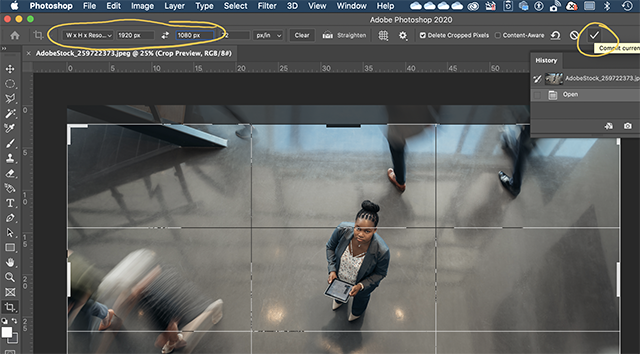
Enter your desired dimensions in the boxes. In this example I’ve used 1920px by 1080px which is the resolution for most HD displays.
Once you are happy with your measurements click on the tick icon to confirm and crop the image.
Export the image
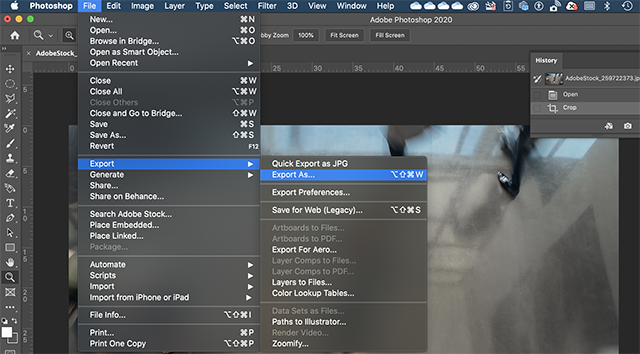
Now you have cropped the image, choose Export from the file menu and then Export As.
Choose image settings and export
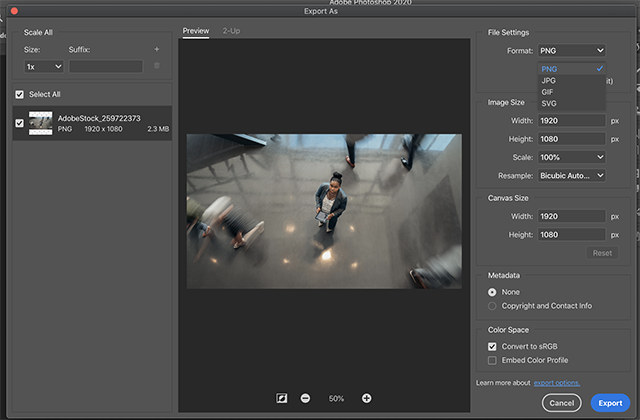
In the Export dialog box, choose the image format. The common formats are JPG (or JPEG), PNG, SVG and GIF. The dialog box also allows you to specify a different resolution if you want to, or export multiple images from the same file using the scale options on the top left of the menu. When you are happy with your options click on the Export button.
Upload to WordPress
You can either upload the image to WordPress through the media library but for this example we will upload the image whilst working on the page we are editing.
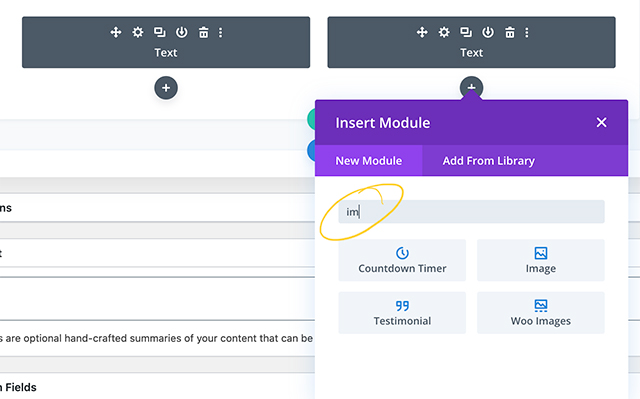
Go to the Pages menu and click on the page you wish to add or edit the image. In this example we are using the classic builder view for Divi but you can choose to use the frontend builder view. The reason I use this view is that it makes it easy to identify which module you wish to edit. To add an image module, click on the grey + button and in the window that pops open start typing “image”. This will filter the modules so you can easily find the one you are looking for.
Click on the Image module.
Upload or choose from library
When you click on the image module the media library appears. You can add an image from the library or click on Upload Files to upload the image you resized in PhotoShop. You can also insert an image from its URL or web address but don’t forget to check copyright permissions.
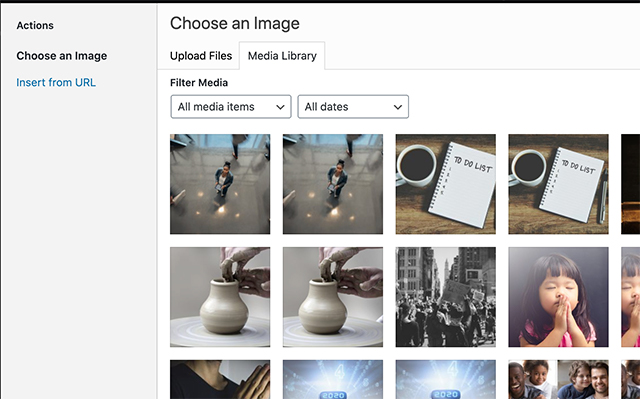
Image settings
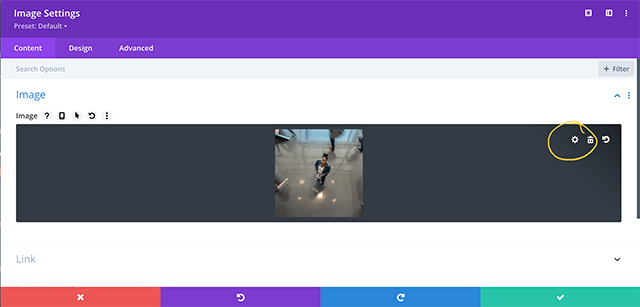
Once you’ve chosen the image and clicked on the Upload an Image button to insert your chosen image into the module. Click on the green tick button and that’s it.
If you want to change an existing image, simply click on the image module, hover over the image in the module until you see the settings button. Click on that and the media library opens, allowing you to replace the image.
Thinking of building your own website?
If you are interested in making your own website using Divi but don’t know where to start, we can help you with that. Drop us a line using the chatbot or email hello@neunetworks.com.
Microsoft launches Outlook Focus Mode
Outlook focus mode is a great new way to boost your productivity by only showing the email accounts you need to see according to what you are doing.
4 reasons why you need to add more content to your website
Find out how creating and publishing content regularly such as blogs can improve your search rankings in Google.
Create a professional eCommerce site in 6 simple steps
Wondering how you can make the move to take your business online? Read on to find out how to create a professional eCommerce site


